AiVRIC Academy
Course progress
0%
Provider Course • P1

Provider Onboarding Foundations

This course teaches provider teams how to launch and operate a CloudSignals white-label service. You'll learn the provider model, the five-phase go-live framework, client onboarding, findings quality standards, and the reporting cadence that keeps clients informed and engaged.

~45 minutes 6 modules Provider team, delivery leads, client success
Take this course first if you are new to operating a CloudSignals provider tenant. Follow it with Provider Admin & CRPM Operations for the administration layer, and Getting Started with RiskOps for the practitioner risk workflow.
1

The Provider Model

Understand what a white-label provider tenant is, who owns what, and where the boundaries lie.

What a white-label provider tenant is

A white-label provider tenant is a branded CloudSignals workspace operated by a partner, managed service provider, advisory firm, or internal service team. It lets the provider present CloudSignals under their own brand while retaining the full platform capability underneath.

The provider tenant is the operational hub. From it, the provider team:

  • Onboards and manages downstream clients — the businesses whose cloud environments are assessed.
  • Runs posture scans and reviews findings on behalf of or alongside clients.
  • Manages risk treatment and compliance workflows.
  • Prepares and delivers client-facing reports and operating reviews.

Core terms at a glance

TermWhat it means
ProviderThe organization operating the white-label CloudSignals service — your organization.
ClientA customer or business entity whose cloud environment the provider manages or assesses.
Client environmentA cloud account, subscription, project, or deployment environment connected to CloudSignals.
FindingA detected security, compliance, exposure, or configuration issue identified by a scan.
Risk treatmentThe decision and work activity used to remediate, mitigate, accept, or transfer a risk.
Risk RegisterThe operating record of risk items, treatment plans, ownership, status, and evidence.
Managed entityA GRC profile representing a client organization, business unit, or reporting scope used for risk intelligence and ownership context.
EntitlementThe features and module access granted to the provider or client — e.g., whether RiskOps is enabled.
Provider ConsoleThe provider administration workspace for managing clients, entitlements, billing drafts, branding, and provider team activity.

Role model

Provider access should follow least privilege. Every provider team member should have the minimum role required to do their job. Shared accounts are not permitted.

RoleWhat they doWhat they need access to
Provider AdminFull provider workspace administration — branding, users, clients, entitlements, GRC config, RiskOpsProvider Console, all settings
Provider OperatorDay-to-day client operations — scans, assets, findings, risk work queues, reportsClients, scans, findings, RiskOps
Provider SupportClient support and triage — status checks, limited operational viewsSupport records, client status views
GRC AdminGovernance setup — managed entities, GRC users, GRC AI settings, role assignmentGRC Administration
Provider AuditorRead-only review — reports, audit activity, selected GRC/RiskOps viewsDashboards, reports, read-only views
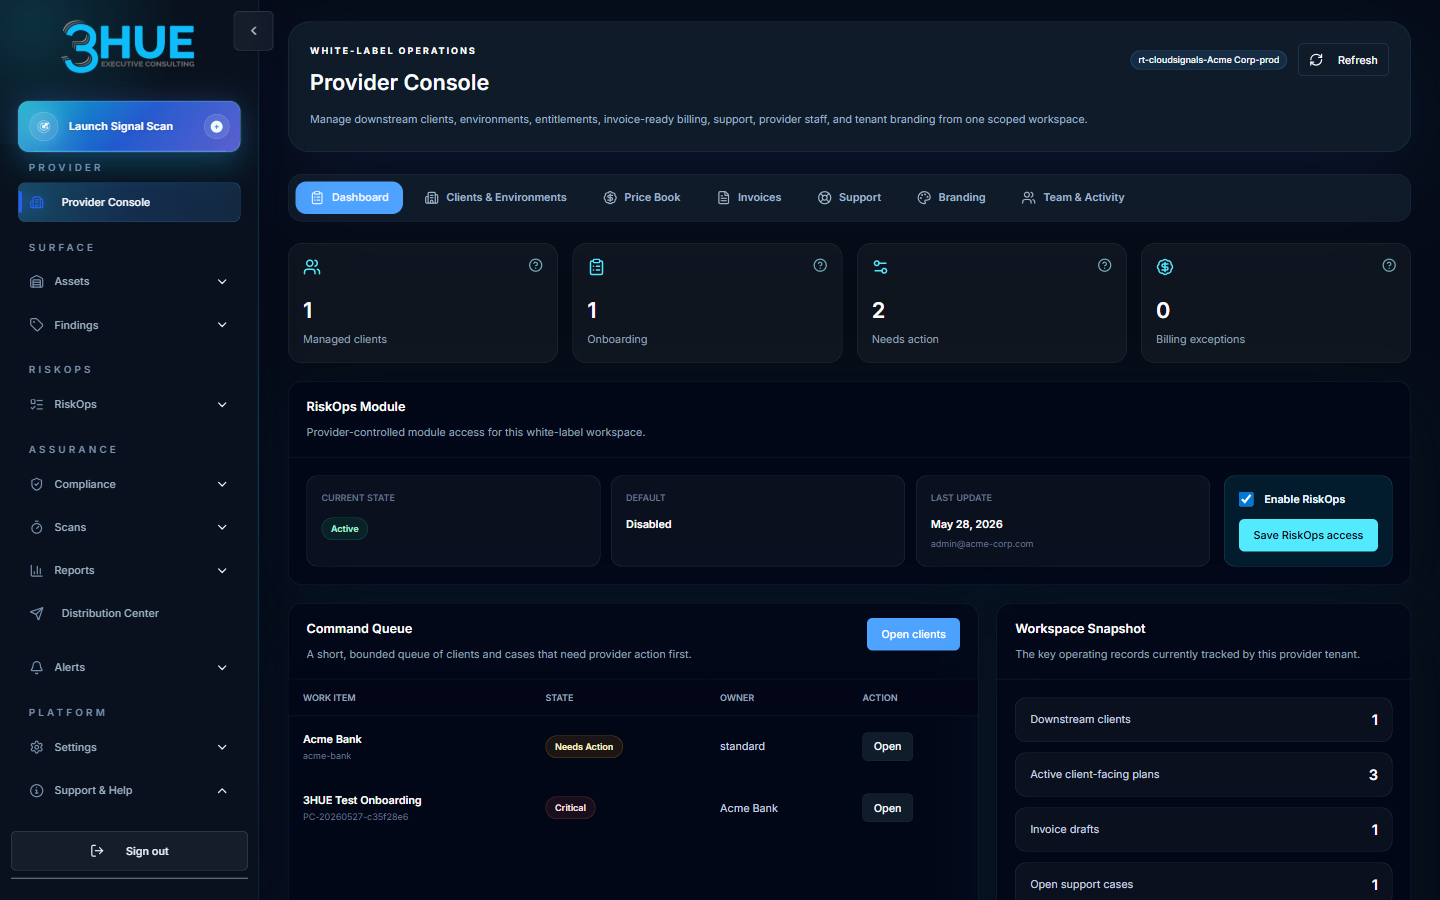
Live app — Provider Console Expand Provider Console Dashboard showing KPI tiles for managed clients, onboarding count, needs action count, the RiskOps Module entitlement section, Command Queue, and Workspace Snapshot
Provider Console Dashboard — the primary workspace for provider admins. KPI tiles, RiskOps module state, command queue, and workspace snapshot are all visible from this single view.
Provider Admin is not a default operational role. Admins manage the platform, not day-to-day findings. Avoid using Admin accounts for routine scan and findings work — use an Operator account. This keeps the blast radius of a misconfiguration small and the audit trail clean.

What the provider is and is not responsible for

Provider is responsible for

Branding, user management, client onboarding, scan scheduling, findings triage quality, risk register maintenance, client-facing reporting, support escalation, and data handling practices.

AiVRIC is responsible for

Underlying platform operation, tenant availability, security controls, product capabilities, connector integrations, and escalation support for platform issues.

Knowledge Check
Which role is responsible for full provider workspace administration, including branding, client management, and RiskOps entitlements?
Provider Operator — they handle day-to-day client operations and have full access by default.
GRC Admin — they manage all governance and administrative functions across the tenant.
Provider Admin — they own the full provider workspace including branding, users, entitlements, and Provider Console.
Provider Support — they have elevated access for client triage and escalation.
Move on when you can identify each role and its primary responsibilities.
2

Launch Phases

The five-phase framework from tenant readiness to operational rollout.

Every CloudSignals provider launch follows five phases. Each phase has a clear entry state and exit criteria. Moving to the next phase before the current phase is complete is the most common cause of go-live delays.

Phase 1 — Tenant Readiness

What happens: AiVRIC provisions the provider tenant. Provider confirms name, logo, favicon, and color palette. Provider confirms the administrator list, support contacts, portal URL, sign-in flow, package, and launch scope.

Exit criteria: Portal loads, branding is confirmed, administrator list is finalized, and launch scope is agreed.

Phase 2 — Provider Team Setup

What happens: Provider administrators, operators, and support users are invited. Roles are assigned. The delivery team reviews this training. A pilot client environment is selected.

Exit criteria: All provider users can sign in. Roles are confirmed. Training is complete. Pilot client is identified.

Phase 3 — First Client Onboarding

What happens: Create the client record. Collect cloud account identifiers. Configure cloud access. Run the first scan. Validate findings and coverage. Prepare the first client-facing review.

Exit criteria: First scan complete, findings validated, first review delivered or scheduled.

Phase 4 — Operational Rollout

What happens: Additional client environments are connected. Scan cadence and review cadence are established. Remediation and risk treatment tracking begins. Reporting templates are finalized. Support and escalation rhythm is established.

Exit criteria: Multiple clients active, recurring cadences running, support workflow tested.

First 30 days success plan

WeekTarget outcome
Week 1Provider tenant branded and accessible. Administrators active. Pilot client selected. First environment connected. Initial scan completed.
Week 2Findings reviewed and validated. Top risks entered into Risk Register. Reporting format confirmed. First client-facing review scheduled.
Week 3Remediation tracking active. Additional provider users trained. Support workflow tested. Second client or environment planned.
Week 4Operating review cadence established. Package and service assumptions reviewed. Provider success metrics defined. Expansion plan agreed.
Knowledge Check
In which launch phase does the provider first run a scan, validate findings, and prepare the initial client review?
Phase 2 — Provider Team Setup. Once users are invited, the first scan runs automatically.
Phase 3 — First Client Onboarding. This phase covers creating the client record, connecting the environment, running the first scan, validating findings, and preparing the first review.
Phase 1 — Tenant Readiness. Scanning begins as soon as the portal is provisioned.
Phase 4 — Operational Rollout. The first scan happens during rollout once all users are trained.
Move on when you can name all five phases and their exit criteria without looking.
3

Branding & Portal Setup

Verify the portal is client-ready before onboarding begins.

What to verify before using the portal with clients

Branding is not cosmetic — a provider portal that shows incorrect names, missing logos, or default AiVRIC branding creates client confusion and signals an unprepared service. Complete the branding checklist before scheduling any client interaction through the portal.

Provider display name — the name shown in the portal matches your organization's brand.
Logo — light mode — your logo appears correctly on the light-mode portal header and sidebar.
Logo — dark mode — your logo appears correctly in dark mode. A dark-specific logo URL is strongly recommended to avoid legibility issues.
Favicon — your favicon appears in the browser tab where supported.
Primary and secondary colors — palette is correct, contrast is sufficient, and buttons are readable.
Portal URL — the portal loads at the correct provider URL without redirects to a default domain.
Support email or link — your support contact is configured and correct.
No placeholder branding remains — no "AiVRIC" default logo, no placeholder text in provider name.

Logo technical requirements

  • Use HTTPS or root-relative URLs — the browser must be able to load the image without sign-in.
  • Supported formats: SVG, PNG, WebP (preferred). JPG when transparency is not needed.
  • Recommended dimensions: 320×96 or 640×192 pixels.
  • Recommended maximum file size: ~512 KB.
  • Transparent backgrounds are strongly recommended — they work in both light and dark modes.
  • If no dark logo URL is supplied, the light logo is used in dark mode — test this before launch.
In the platform — Verify branding after publish
1
Navigate to Provider Console > Branding. Review the draft configuration before publishing.
2
Confirm all fields: company name, support email, light logo URL, dark logo URL, favicon URL, and color palette.
3
If a logo URL is from Google Drive or another file-sharing service, open the URL directly in a private browser window to confirm it loads without sign-in. If it requires authentication, the logo will not appear in the portal — use a CDN or object storage URL instead.
4
Publish the draft. Note: saving a draft does not apply changes. You must publish for the branding to become visible.
5
After publishing, hard-refresh the portal (Ctrl+Shift+R / Cmd+Shift+R) to force the browser to load updated assets.
6
Verify: logo in light mode, logo in dark mode, favicon in browser tab, sidebar text readability, and button contrast. Check the Provider Console preview pane as well.
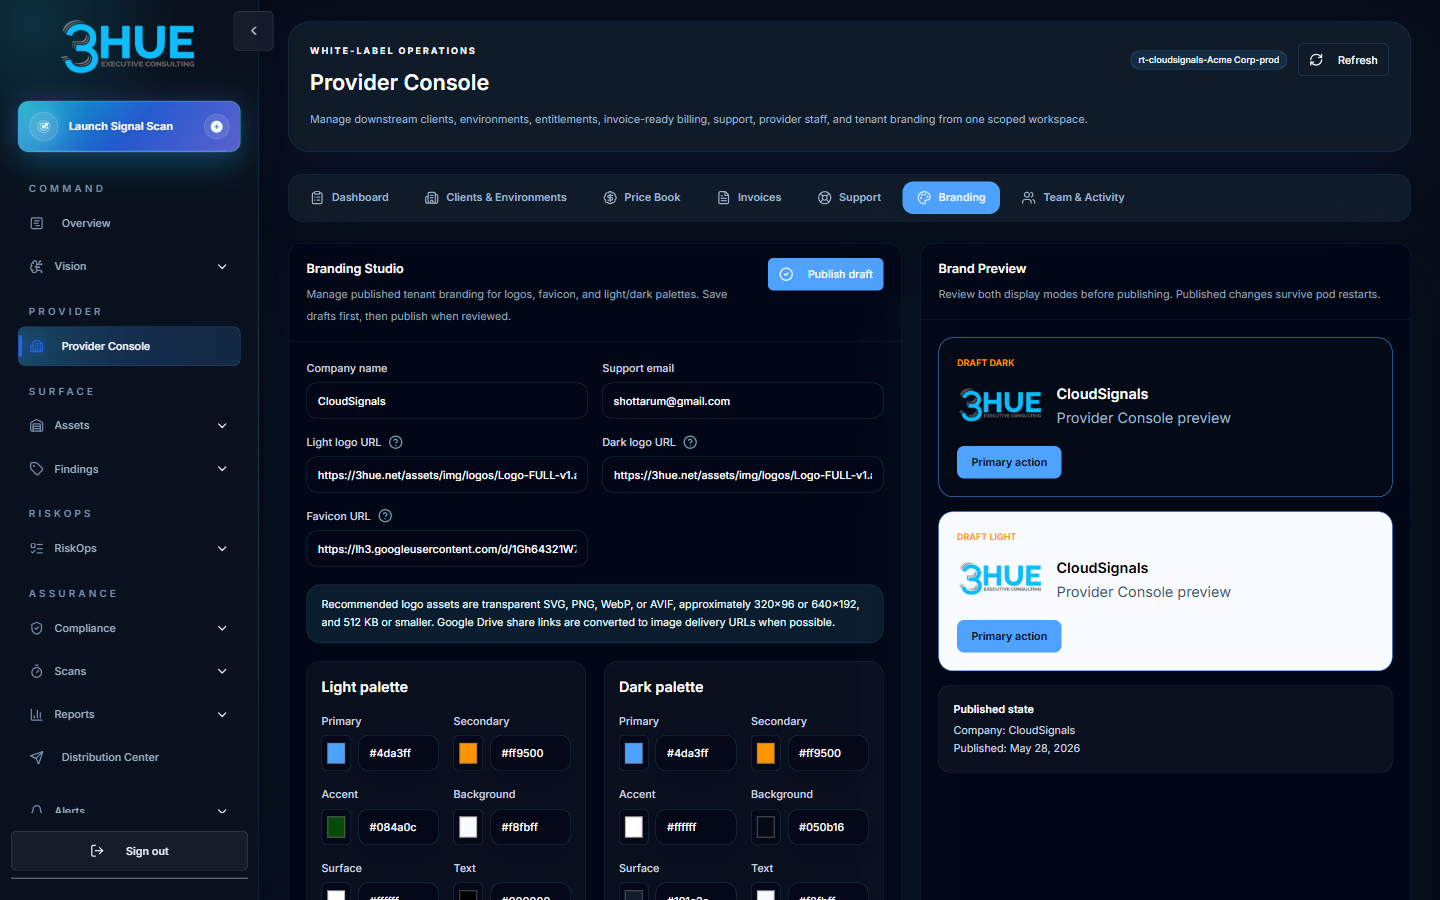
Provider Console — Branding Expand Provider Console Branding Studio showing logo URL fields, light and dark palette configuration, brand preview panel, and published state indicator
Branding Studio — configure logo URLs, palette colors, and support email. The Brand Preview panel on the right shows how the portal will render before you publish.
Knowledge Check
After updating branding settings, what must you do for the changes to become visible to users in the portal?
Save the draft — saving automatically applies branding to all active sessions within a few minutes.
Publish the draft — saving only stores the configuration; changes are not applied until you explicitly publish.
Contact AiVRIC support — branding changes require a platform-side deployment after saving.
Invite a test user — branding only activates when a new user signs in for the first time.
Move on when the branding checklist is fully checked and the portal has been verified in both light and dark mode.
4

Client Onboarding Workflow

Connect a client environment end to end and validate the first scan.

The nine-step onboarding workflow

Follow these steps for every new client. Skipping steps — especially commercial confirmation and scope agreement — is the most common cause of scope disputes and access issues.

Client Onboarding — Step by step
1
Confirm commercial approval. Before onboarding, confirm the client is authorized for the agreed service package, support level, and scan scope. Do not begin technical work until this is confirmed.
2
Create the client record. In Provider Console, create the client entry with: legal name, display name, primary contact, primary technical contact, cloud provider, environment type, and package tier.
3
Confirm cloud access. Work with the client to establish read-only or security-assessment access. The method varies by cloud provider (see cloud-specific notes below). Do not use credentials with write access — read-only is the correct access model for posture scanning.
4
Connect the environment. Add the cloud account, subscription, project, or integration in CloudSignals. Confirm the scope matches what was agreed — region, account, subscription, or namespace boundaries.
5
Run the first scan. Start with a controlled scan of the agreed environment. Confirm the scan completes without errors and that expected resources appear in inventory.
6
Validate initial results. Check for scope gaps, missing permissions, or unexpectedly empty results. A scan that returns zero resources on a production environment almost always indicates an access or scope issue, not a clean environment.
7
Review findings. Prioritize critical and high severity items first. Identify which findings require remediation, risk treatment entry, or a client discussion before the first review.
8
Create a managed entity. In GRC Administration, create a managed entity for this client. Assign the process owner, business context, and regulatory context. This enables business process mapping and RiskOps records for the client.
9
Prepare the client review. Produce a concise summary showing: posture overview, top critical/high findings, recommended next steps, and any required client action items. Deliver or schedule within 7 days of the initial scan.

Cloud provider access notes

ProviderAccess methodKey validation
AWSRead-only IAM role via role assumption; organization-wide access via SCP if multi-accountConfirm account ID and region scope; confirm organization-wide access is intentional before enabling broad scans
AzureService Principal with Reader + Security Reader permissions; Management Group scope if multiple subscriptionsConfirm tenant ID, subscription IDs; validate management group scope if used
Google CloudService Account with viewer IAM roles; project-level or folder/org levelConfirm project IDs and organization scope; validate folder-level discovery expectations
KubernetesRead-only RBAC ClusterRole; kubeconfig or service account tokenConfirm cluster name, namespace scope; avoid collecting secrets or workload data outside approved scope

Information to collect for each client

Identity & contact

Legal client name, display name, primary business contact, primary technical contact, support expectations.

Environment details

Cloud provider, account / subscription / project IDs, environment type (prod / staging / dev), scan scope, regions or namespaces.

Service context

Package or service tier, reporting cadence, compliance frameworks in scope, special handling requirements.
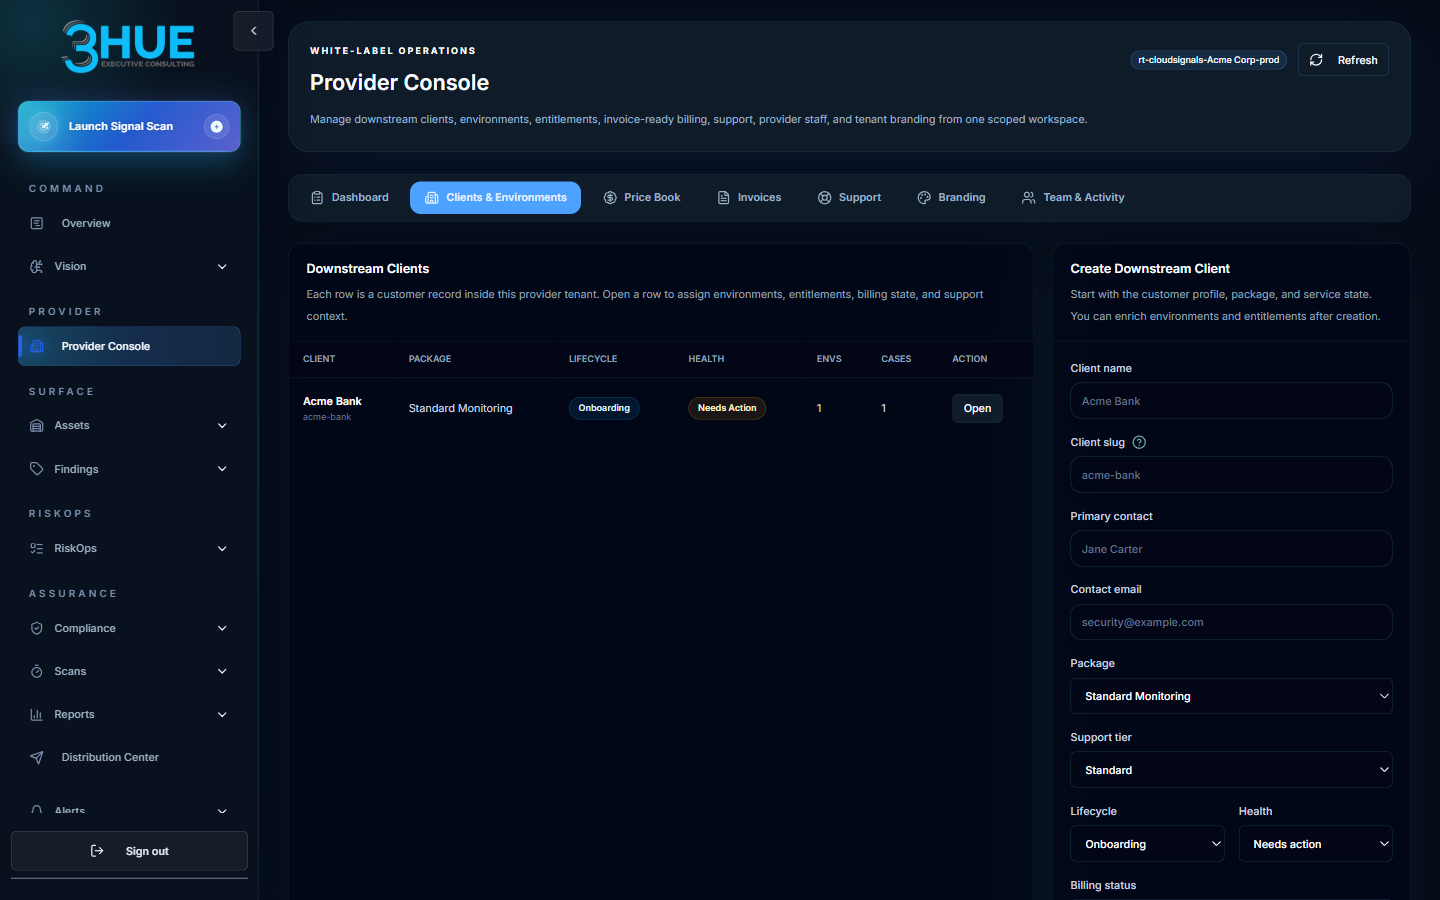
Provider Console — Clients Expand Provider Console Downstream Clients tab showing client table with package, lifecycle state, health status, and a Create Downstream Client form panel on the right with all required fields
Downstream Clients — the client table shows package, lifecycle state, health, and action. The Create Client form on the right collects legal name, package, support tier, lifecycle, and billing status — all required before connecting a cloud environment.
Knowledge Check
What should you do immediately if a first scan returns zero resources on a production environment?
Proceed to the client review — a clean environment is a positive signal worth communicating.
Wait 24 hours — CloudSignals requires one full cycle before resources appear.
Investigate the access and scope configuration — zero results on a production environment almost always indicate a permissions gap, scope misconfiguration, or incorrect account/region selection.
Escalate to AiVRIC immediately — empty scans require a platform-level investigation.
Move on when you can walk through all nine onboarding steps without the guide and have collected the required client information.
5

Operating Findings & Risk Register

Turn raw scan results into actionable, client-ready risk intelligence.

Findings as operational records

Findings should be handled as operational records, not just alerts. The difference matters: an alert mindset produces raw dumps that overwhelm clients; an operational records mindset produces context-rich, business-relevant risk intelligence that clients can act on.

Provider findings triage workflow

Findings — Recommended triage workflow
1
Open Findings. Filter by severity: Critical and High first. Do not start with Medium or Low — you'll lose the priority signal.
2
Validate each finding. Confirm it is genuine — not a false positive due to scope, missing context, or a known approved exception. Do not close Critical findings without documented rationale.
3
Confirm the affected environment and asset. Check the cloud account, region, resource type, and owner. Context matters — the same finding on a dev environment vs. a production payment processor has very different business urgency.
4
Add business context. Annotate the finding with the client impact — which service, which data, which process is at risk. This makes the finding usable in a client review without additional explanation.
5
Select a treatment disposition: Remediate (fix the issue), Mitigate (compensating control), Accept (formal exception with justification and expiry), Transfer, or Defer with documented rationale.
6
Assign an owner and set a due date. Every treated finding needs a named person accountable for the next action.
7
Track and validate. Validate remediation after the next scan. For accepted risks, track the expiry date and review before it lapses.

Triage dispositions

DispositionWhen to useRequired documentation
RemediateThe root cause should and can be fixed.Fix description, assigned engineer, target completion date, verification method.
MitigateFull remediation is blocked; compensating controls reduce residual risk.Compensating control description, reason remediation is deferred, future remediation date.
AcceptResidual risk is within risk appetite; business justification exists.Named approver, justification statement, expiry date (time-bounded).
TransferRisk ownership or treatment is transferred to a third party (insurance, vendor).Transfer recipient, coverage confirmation, residual risk assessment.
False positiveFinding does not apply or is not valid in this environment.Documented reason; note so it can be reviewed if the control changes.

Risk Register — What to capture

For each significant risk, the Risk Register should include:

Identity

Risk ID, title, description, managed entity / client scope, source findings.

Assessment

Severity, likelihood, business impact, risk level (composite).

Treatment

Treatment decision, action plan, assigned owner, due date, current status.

Evidence

Screenshots, scan evidence, remediation confirmations, exception approvals.

Findings quality standards

What not to send clients: Do not send raw finding dumps. Do not overwhelm clients with undifferentiated lists of 300+ findings. Do not use finding titles as-is without business context translation. Do not share findings outside approved channels — findings contain sensitive configuration data.
  • Group related findings when presenting to clients — five findings on the same IAM misconfiguration is one conversation, not five.
  • Explain business impact in plain language — "S3 bucket publicly accessible" means nothing to a CFO; "Customer contract data accessible to anyone on the internet" drives action.
  • Separate urgent fixes from maturity improvements — Critical/High findings needing immediate action should be clearly differentiated from Medium/Low hygiene items.
  • Validate before presenting — confirm findings are genuine and applicable before putting them in a client review.
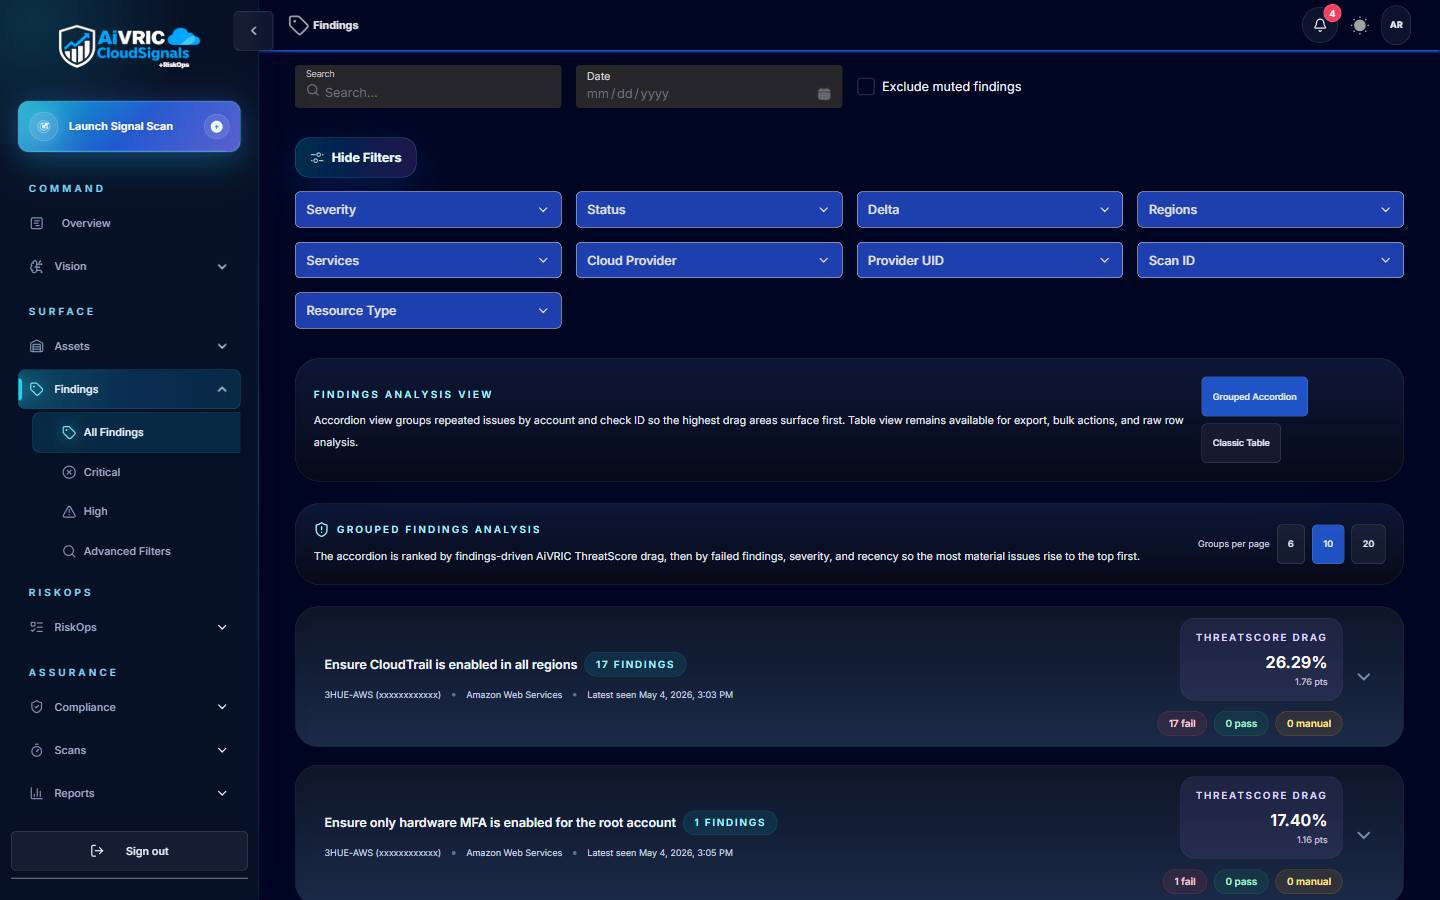
/findings Expand Findings list with Critical and High severity filter active, showing AI analysis groupings and individual finding rows
Findings — triage starting point. Filter Critical+High first. Each grouping shows the AI-identified root cause pattern across related findings.
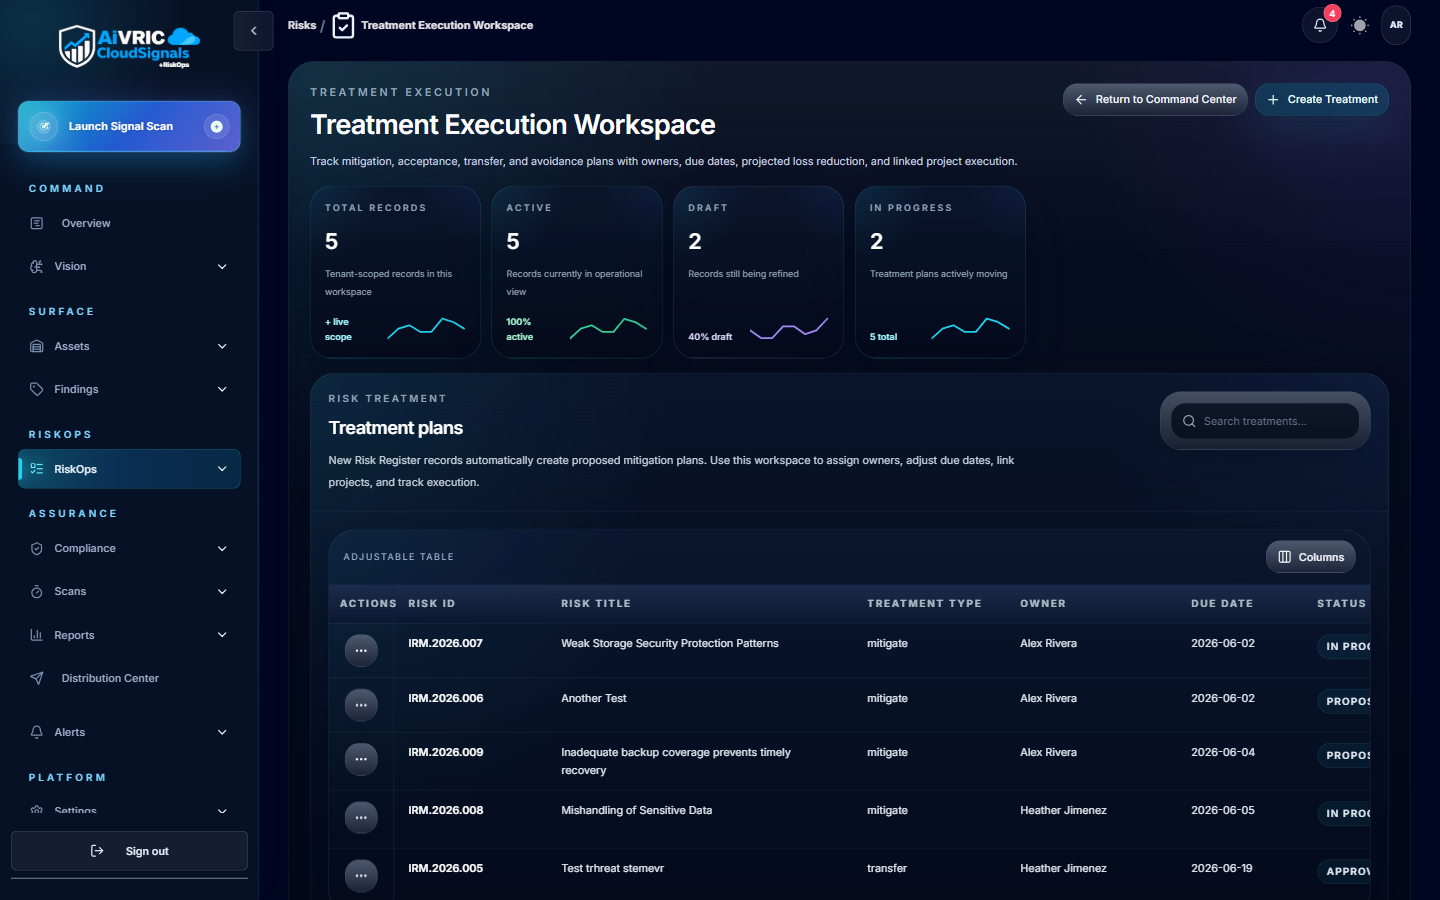
/risks/treatments Expand Treatment Execution Workspace showing active treatment plans with RMR IDs, treatment types, owners, and status
Treatment plans — where triaged findings become formal risk commitments with owners, types, and due dates visible to governance approvers.
Knowledge Check
Which of the following best describes the correct quality standard for sharing findings with clients?
Export all findings as a raw CSV and share at the start of the client review — clients should see the full, unfiltered dataset.
Share only findings with a remediation plan already created — unplanned findings should not be disclosed until a fix is ready.
Validate, group related findings, translate technical titles into business impact language, prioritize Critical/High, and differentiate urgent items from longer-term hygiene work.
Share only Critical findings — Medium and Low findings can be managed by the provider without client involvement.
Move on when you can describe each triage disposition and articulate the quality standard for client-facing findings communication.
6

Reporting & Client Reviews

Deliver structured, consistent reviews that build client confidence.

Reporting cadence

Client typeCadenceAudience
New client — first reviewWithin 7 days of initial scanClient technical contact and business contact
Active managed clientMonthly operating reviewClient technical contact
High-risk or regulated clientWeekly or biweekly risk reviewClient technical contact, compliance lead
Executive sponsorQuarterly business review (QBR)Client executive, provider executive sponsor

Recommended report contents

1. Executive summary

Current posture state, material changes since last review, top 1–3 business risks requiring attention.

2. Environment scope

Cloud providers covered, accounts/subscriptions scanned, date and age of last scan.

3. Critical & high findings

New, open, and remediated findings since last review. Grouped by theme or service, not as a raw list.

4. Risk Register changes

New risks added, risks closed, changes in treatment status, any expired exceptions.

5. Remediation progress

Treatment plans with overdue status, completed remediations, and MTTR trend if available.

6. Recommended next actions

Prioritized action items with owners and timelines. Client action items distinguished from provider action items.
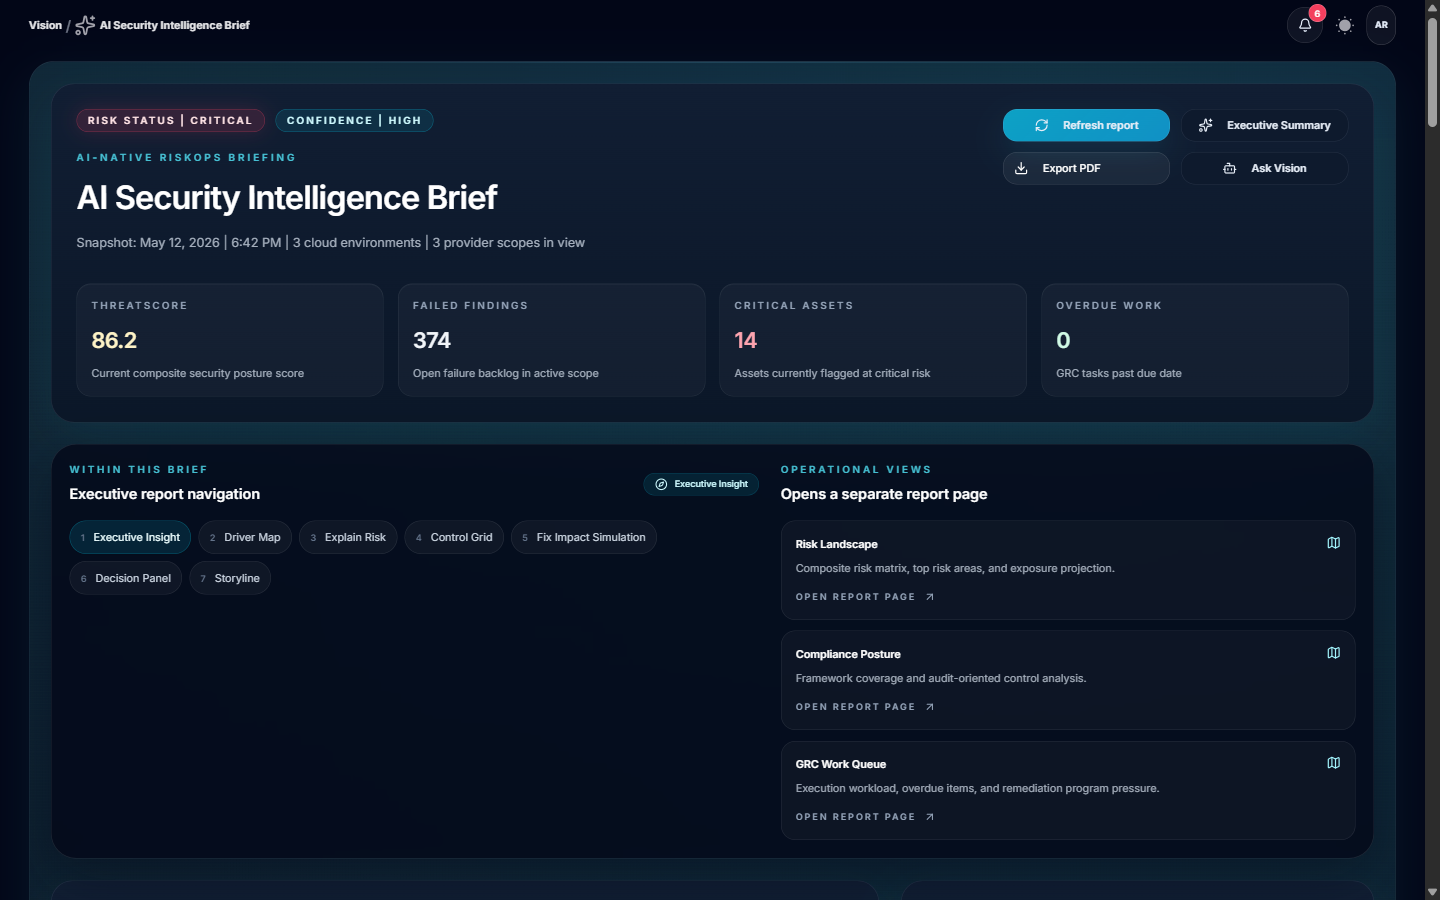
Vision — Intelligence Brief Expand AI Security Intelligence Brief with ThreatScore 86.2, 374 failed findings, 14 critical assets, and navigation to Executive Insight, Driver Map, Risk Landscape, Compliance Posture
AI Security Intelligence Brief — the AI-generated executive brief synthesizes ThreatScore, finding volume, and critical asset exposure into a board-ready narrative. Use this for executive operating reviews and quarterly business reviews.
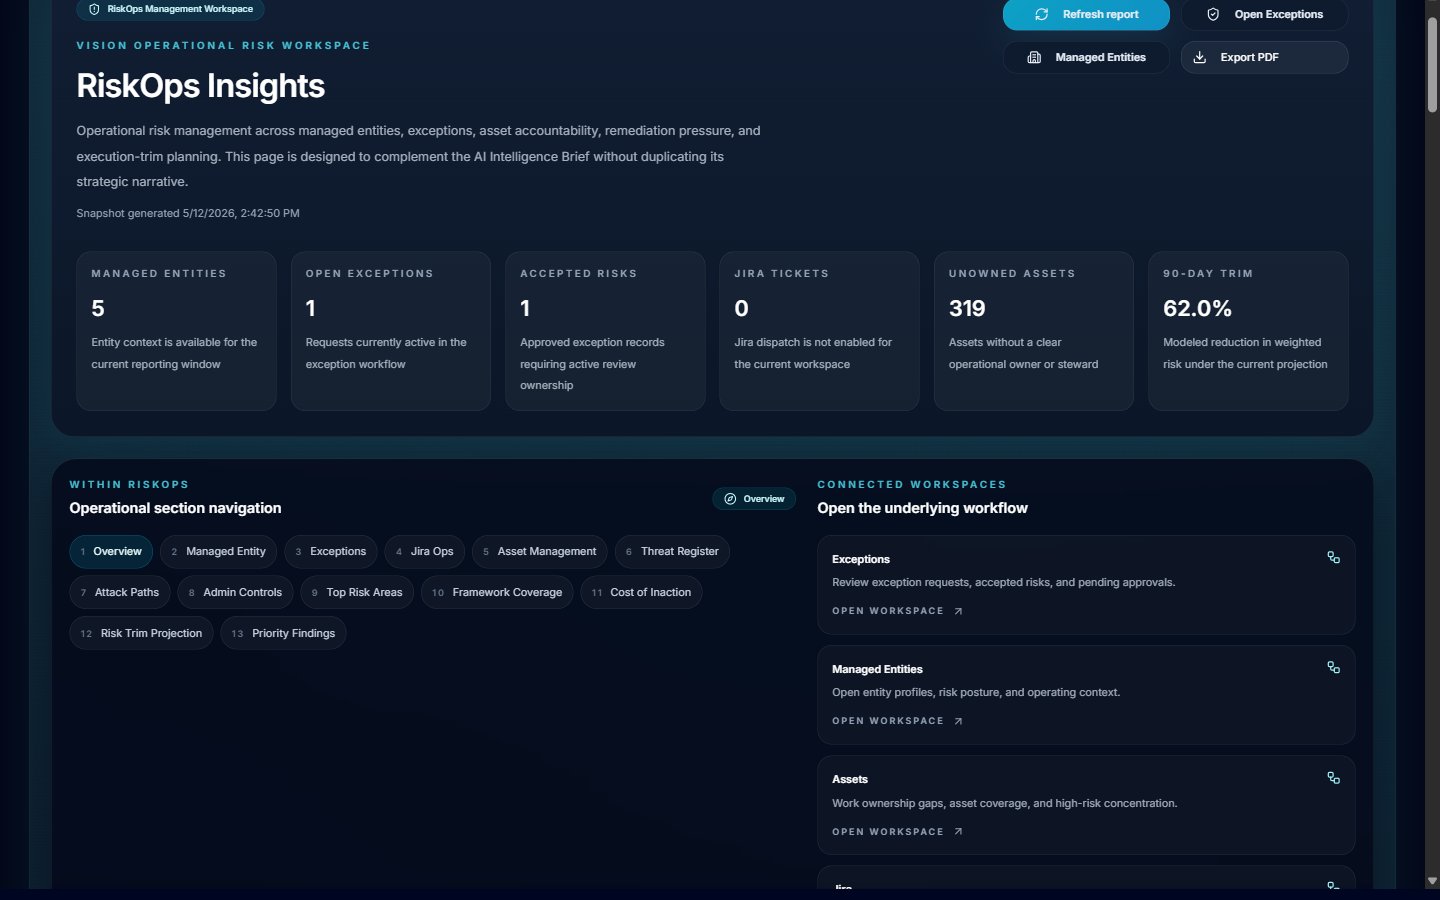
Vision — RiskOps Insights Expand RiskOps Insights report showing managed entities count, open exceptions, accepted risks, SLA threats and operational workflow navigation steps
RiskOps Insights — the operational view of risk metrics across managed entities. Shows open exceptions, accepted risks, SLA threats, and the step-by-step workflow to advance each item — ideal for monthly managed client reviews.

What not to include in client communications

Never share: Internal AiVRIC deployment details • GitOps repository paths • Cluster, namespace, or Kubernetes internals • Secrets, tokens, or private keys • Unreviewed raw exports that may expose unrelated client information • Unsupported roadmap commitments.

Support escalation workflow

When an issue cannot be resolved at the provider level, escalate to AiVRIC support. When escalating, always include:

  • Provider name and portal URL
  • Client name and environment name
  • User email if access-related
  • Time of issue and approximate duration
  • Screenshot or error message (with secrets removed)
  • Steps already attempted
Never include secrets, private keys, access tokens, passwords, or full credential files in support tickets.

Key actions for this module

Define reporting cadence for each active client — document whether they are monthly, biweekly, or weekly, and assign a provider owner for each.
Create a report template — use the six-section structure above as your starting format. Customize for client audience (technical vs. executive).
Confirm the support escalation path — every provider team member should know the provider-level escalation contact and the AiVRIC support channel.
Schedule the first QBR — even for new clients, put a quarterly business review on the calendar at onboarding. It sets expectations and prevents the relationship from becoming purely reactive.
🏅
Course complete!
You've completed Provider Onboarding Foundations. Your team is ready to launch the CloudSignals provider service and onboard your first client.
Next: Provider Admin & CRPM Ops All courses
Complete this module to unlock your course completion.