AiVRIC Academy
Course progress
0%
Admin Course • P2

Provider Admin & CRPM Operations

This course teaches Provider Administrators how to configure and operate the CloudSignals provider instance — from Provider Console daily operations through GRC Administration, RiskOps entitlement control, AI configuration, and the recurring administrative review cadence.

~60 minutes 7 modules Provider Admin, GRC Admin
Prerequisite: Complete Provider Onboarding Foundations (P1) before this course. That course establishes the operating model context this course builds on. Follow this course with Getting Started with RiskOps for the practitioner risk workflow.
1

Provider Console

Your primary workspace for provider health, client status, and administrative activity.

What the Provider Console is

The Provider Console is the administration workspace for provider operations. It is where admins manage downstream clients, control entitlements, review billing drafts, track support cases, configure branding, and audit provider team activity. It is not the same as the standard CloudSignals operating workspace that operators use for scans, findings, and risk work.

Provider Console dashboard

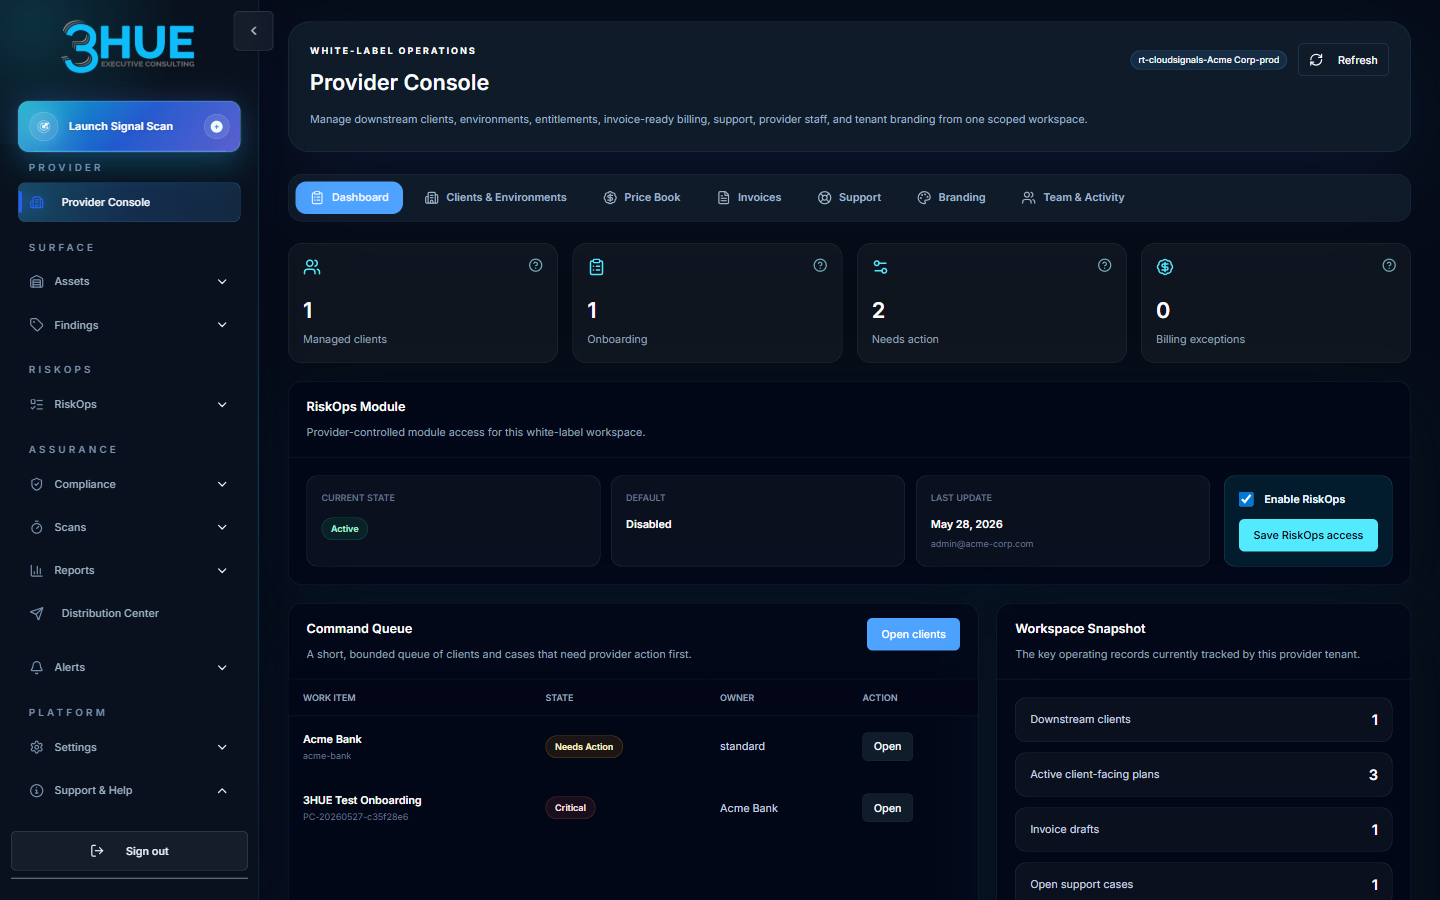
The dashboard gives a snapshot of provider workspace health. Review these items every day during launch and every week during normal operations:

Dashboard itemWhat it tells youWhen to act
Managed client countTotal active downstream clientsWhen the count drops unexpectedly — may indicate an accidental status change
Onboarding countClients in onboarding stateWhen this number is high and not declining — clients may be stuck
Needs action countClients flagged for provider attentionImmediately — Needs Action means a client has an unresolved issue requiring your team
RiskOps module stateWhether RiskOps is enabled for this tenantWhenever the state doesn't match your expectation — mismatched state can affect user navigation
Billing exceptionsInvoice or billing items requiring reviewBefore any client-facing billing communication
Command queuePending administrative commands or operationsWhen items are stuck or erroring
In the platform — Daily Provider Console review
1
Open Provider Console from the main navigation. This is distinct from the standard CloudSignals workspace view.
2
Review the Needs Action count first. Any client in Needs Action state has an unresolved issue — this is always the highest-priority item to investigate.
3
Check Onboarding count. If clients have been in onboarding state for more than 5 business days, investigate whether the first scan has been completed.
4
Review RiskOps module state. Confirm it matches your configuration intent. Mismatched state (showing disabled when you believe it's enabled) should be investigated and resolved before users begin work.
5
Review the command queue for stuck or erroring items. Contact AiVRIC support if commands remain in an error state after retry.
Live app — Provider Console Expand Provider Console Dashboard showing KPI tiles, RiskOps Module state with Enable RiskOps toggle, Command Queue with client work items, and Workspace Snapshot metrics
Provider Console Dashboard — the daily admin starting point. KPI tiles (managed clients, onboarding, needs action, billing exceptions), RiskOps module state, command queue with client actions, and workspace snapshot — all in one view.
Knowledge Check
How often should a Provider Administrator review the Provider Console during an active client onboarding?
Daily — during launch and active onboarding, the Provider Console should be reviewed every day to catch stuck clients, Needs Action items, and command queue issues.
Weekly — the Provider Console is a strategic tool and weekly review is sufficient even during onboarding.
Monthly — only billing-related items require regular review; client onboarding is tracked in external project tools.
Only when a client reports a problem — the dashboard is reactive, not a proactive monitoring tool.
Move on when you can identify every dashboard item and explain what action each triggers.
2

Client Lifecycle Management

Manage every client from initial onboarding through eventual offboarding.

Client lifecycle states

Every client record in the Provider Console has a lifecycle state. Keeping states accurate is essential — it affects reporting, billing, and support priority routing.

StateMeaningKey actions
Prospect / PlannedClient is approved but not yet onboardingCreate client record, assign provider owner, document package
OnboardingEnvironment connection and first scan in progressConnect cloud environment, run first scan, validate findings, schedule first review
ActiveFully onboarded, receiving ongoing serviceMonitor scan health, track findings/risk treatment, deliver recurring reports
Needs ActionSomething requires provider attentionInvestigate root cause immediately — this should not sit unresolved
PausedService activity paused, typically for commercial reasonsConfirm reason, pause scans, preserve records, communicate with client owner
OffboardingClient is leaving the serviceConfirm termination date, export final reports, remove access, stop scans
ArchivedClient is fully offboarded; records retained per policyFollow data retention and deletion requirements; document closure

Expanding a client

When an active client adds new cloud accounts, services, or environments:

  • Confirm that the expanded scope is within the client's current package entitlement.
  • Confirm updated pricing or package change with the provider commercial owner before connecting new environments.
  • Add the new environment in CloudSignals, run a validation scan, and update the client's managed entity mapping.
  • Update the reporting scope and support expectations to reflect the expanded footprint.

Offboarding a client — checklist
Confirm termination date and any data retention obligations with the provider commercial owner.
Export required final reports and deliver to the client or retain per policy.
Stop scheduled scans and remove cloud access credentials.
Remove or deactivate client user access in CloudSignals.
Archive the client record and document the closure reason.
Confirm data deletion requirements and timeline per the client contract and applicable regulations.
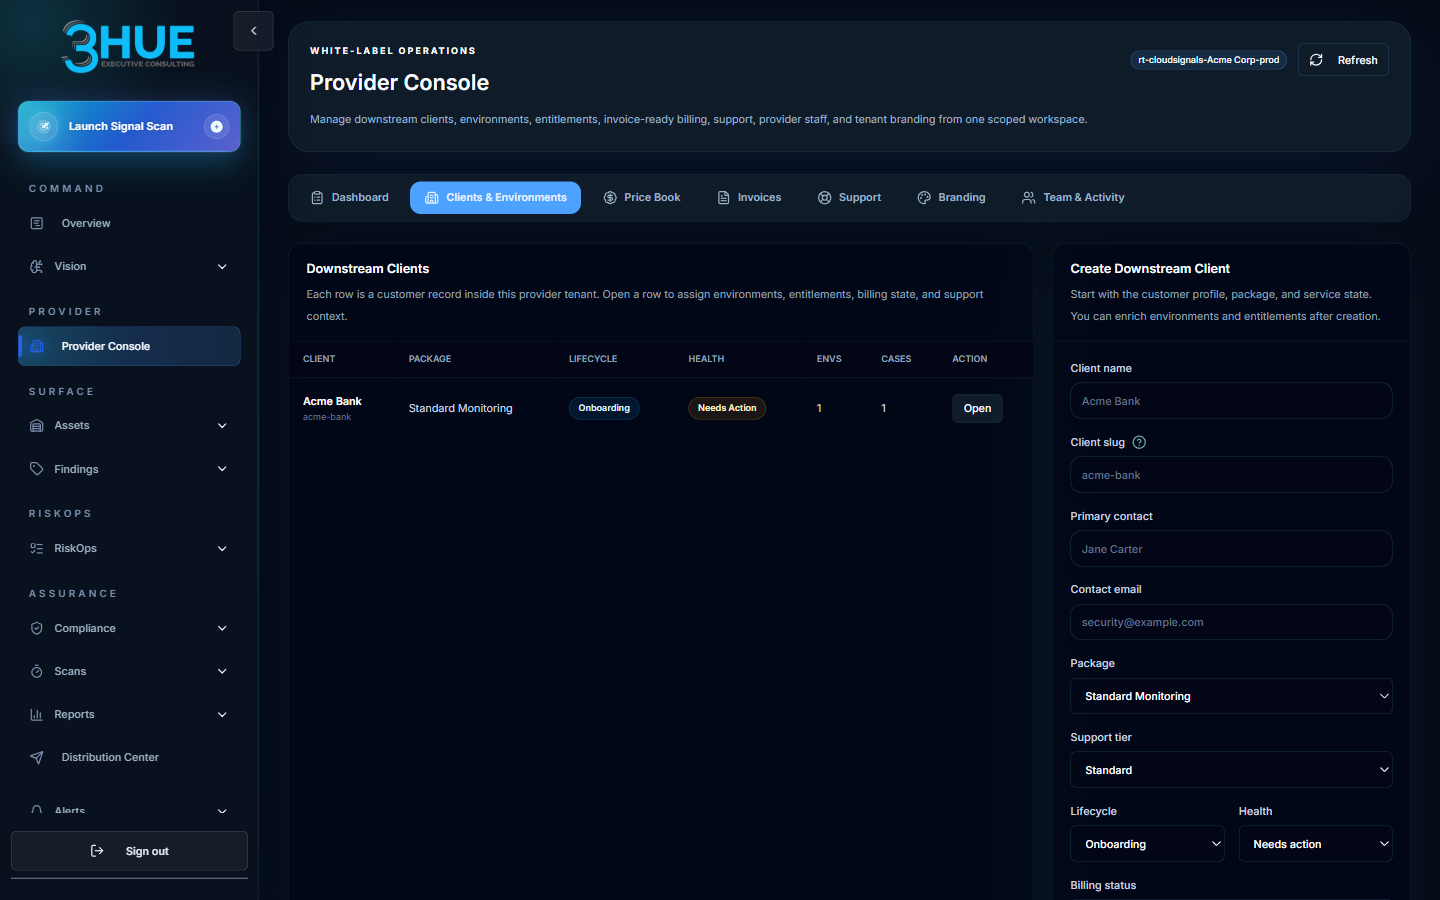
Provider Console — Clients Expand Downstream Clients tab showing client table with package, lifecycle, health, and environment counts, plus Create Downstream Client form with all required fields
Clients & Environments — every row is a client with current lifecycle state, health, and open case count visible. The Create Client panel on the right captures all onboarding fields before any cloud environment is connected.
Move on when you can describe every lifecycle state and the required actions at each transition.
3

Branding Administration

Configure, publish, and validate provider branding for light and dark mode.

The publish vs. save distinction

This is the single most common branding mistake: saving a draft does not apply changes. The branding workflow has two steps — save (stores your configuration) and publish (applies it to the live portal). Many providers spend time troubleshooting why branding isn't appearing after saving, when the issue is simply that the draft was never published.

In the platform — Complete branding workflow
1
Open Provider Console > Branding.
2
Enter or update: Company name, support email, light logo URL, dark logo URL, favicon URL, and both light and dark palette colors.
3
For any logo URL, open it in a private/incognito browser tab and confirm the image loads without sign-in. If it requires authentication, the logo will silently fail to load in the portal.
4
Click Save draft to store the configuration.
5
Click Publish draft. This is the step that applies the changes to the live portal.
6
Hard-refresh the portal (Ctrl+Shift+R / Cmd+Shift+R). Regular refresh may serve cached assets.
7
Verify: logo in light mode, logo in dark mode (toggle theme), favicon in browser tab, button contrast, sidebar readability, and Provider Console preview.

Troubleshooting: logo does not appear

SymptomLikely causeFix
Logo URL is correct but image is brokenFile requires sign-in to accessMove logo to a public CDN, object storage bucket, or your website's static assets folder
Logo appears in light mode but not dark modeNo dark logo URL configuredAdd a dark-mode specific logo URL, or ensure the light logo has a transparent background that works on dark backgrounds
Logo still shows old version after updatingDraft was saved but not published, or browser cachePublish the draft, then hard-refresh
Logo displays externally but not inside the portalContent-Security-Policy or CORS restriction on the hosting originHost the logo on a permissive HTTPS origin (CDN or your own domain); escalate to AiVRIC if the issue persists
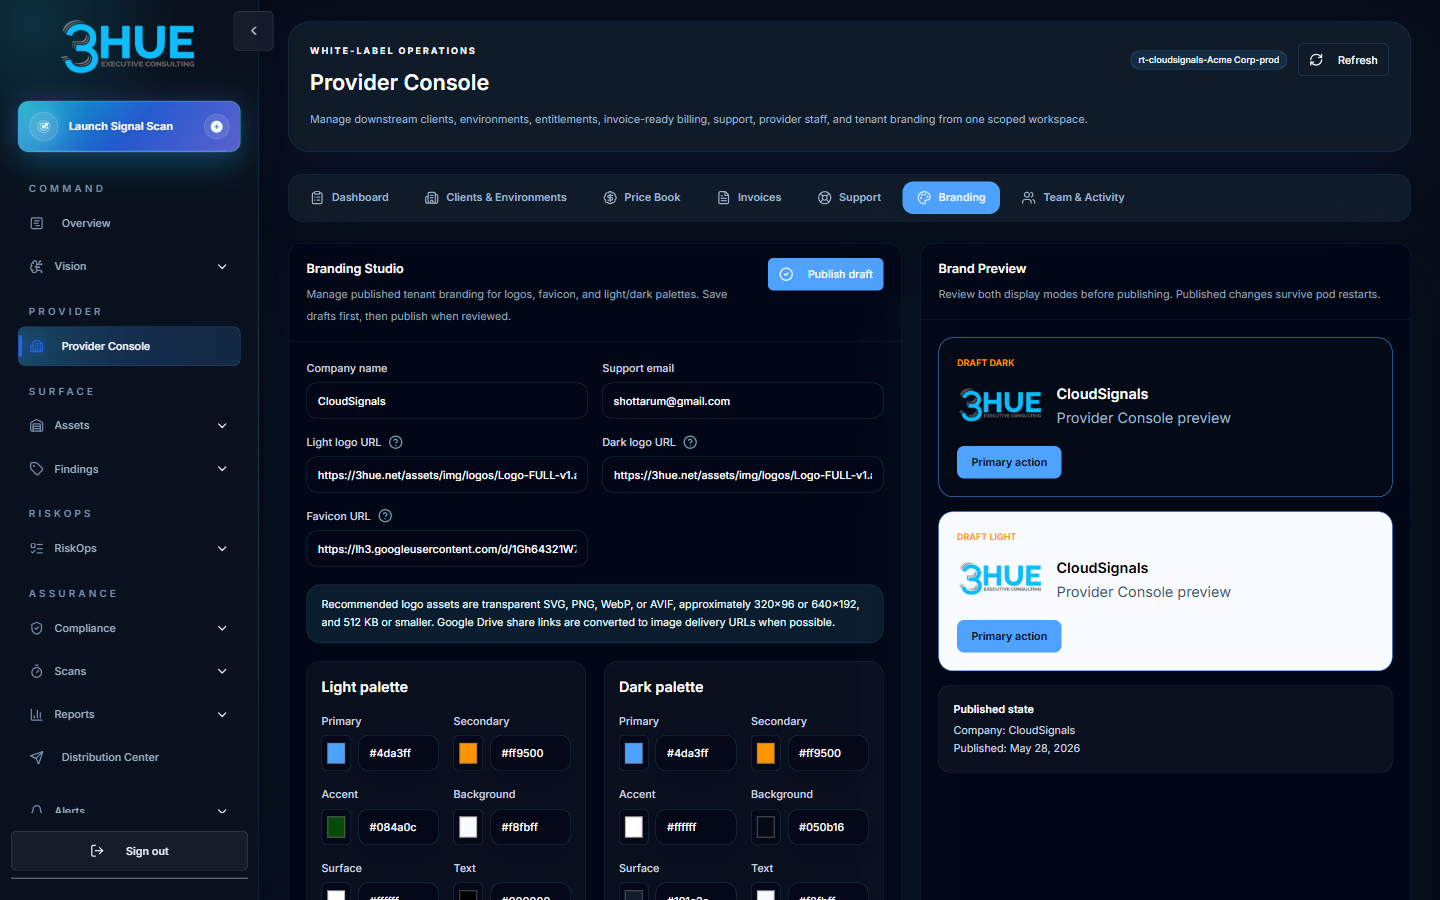
Provider Console — Branding Expand Branding Studio showing company name, support email, logo URL fields for light and dark mode, favicon URL, color palette pickers, brand preview panel, and published state
Branding Studio — configure display name, logo URLs (light + dark), favicon, and color palettes. The Brand Preview panel shows exactly how the portal will render. Save draft stores configuration; Publish draft applies it to the live portal.
Knowledge Check
A provider saves a new logo URL in the branding settings but the old logo still appears after refreshing the portal. What is the most likely cause?
The logo file format is unsupported — CloudSignals only renders SVG logos.
The draft was saved but not published — saving stores the configuration but changes are not applied until the draft is explicitly published, followed by a hard-refresh.
Branding changes require AiVRIC support to deploy — save is only a request, not an automatic update.
The logo URL must use a root-relative path, not an HTTPS URL.
Move on when you can complete the branding workflow including publish and have verified both light and dark mode rendering.
4

GRC Administration

Create managed entities and GRC users in the correct order to enable risk operations.

The two-object GRC model

GRC Administration manages two core record types that power RiskOps workflows:

Managed Entities

An organizational profile representing a client, business unit, subsidiary, or internal reporting scope. Managed entities are the GRC anchor for risk records, asset ownership, business process mapping, and regulatory context.

Create these first, before creating GRC users.

GRC Users

A governance user profile with skills, roles, regulatory scope, and ownership relationships. GRC users are linked to managed entities to define who is responsible for each entity's risk and compliance activity.

Create these after managed entities exist.

Order matters. Managed entities must be created before you can associate GRC users to them. If you create a GRC user and then try to associate a managed entity that doesn't exist yet, the entity won't appear in the association selector. Always create entities first.

Creating a managed entity

In the platform — Managed entity setup
1
Navigate to Settings > GRC Administration > Managed Entities.
2
Click Create managed entity. Enter the legal name and vanity (display) name. Use consistent naming — once entities are referenced in risk records and reports, renaming them creates confusion.
3
Set status to Active, confirm country, and assign a criticality level. Add business context and any applicable regulatory requirement IDs (e.g., SOC 2 scope, GDPR jurisdiction).
4
Save the managed entity. It is now available for GRC user association, asset mapping, and RiskOps records.
5
Repeat for each client or business unit that needs its own risk and compliance scope.

Creating a GRC user

In the platform — GRC user setup
1
Navigate to Settings > GRC Administration > GRC Users.
2
Click Create GRC user. Enter identity details: name, email, title, and department.
3
Link to an app user only when this person needs project or POA&M permissions in the platform. The GRC user profile provides governance context; the app user link provides platform access.
4
Assign GRC roles, select skills and regulatory framework coverage, set backup user and reporting relationship.
5
Associate managed entities. Select every entity this user supports. The entity selector shows active managed entities — if an expected entity is missing, return to Managed Entities and confirm it is active.
6
Save the GRC user. Verify the entity associations appear in the user's profile view.

Common GRC setup issues

IssueCauseResolution
Managed entities don't appear in GRC user associationEntities don't exist yet, or they are in an inactive stateCreate active entities first; then return to GRC user profile and search by name
GRC user can't access RiskOps recordsGRC role not assigned, or RiskOps entitlement not enabled for the tenantAssign the appropriate GRC role; confirm RiskOps entitlement is on (see Module 5)
Entity association shows in create mode but not edit modeEdit mode may not reload the full entity list automaticallyRefresh the page; confirm entity is active; escalate if issue persists
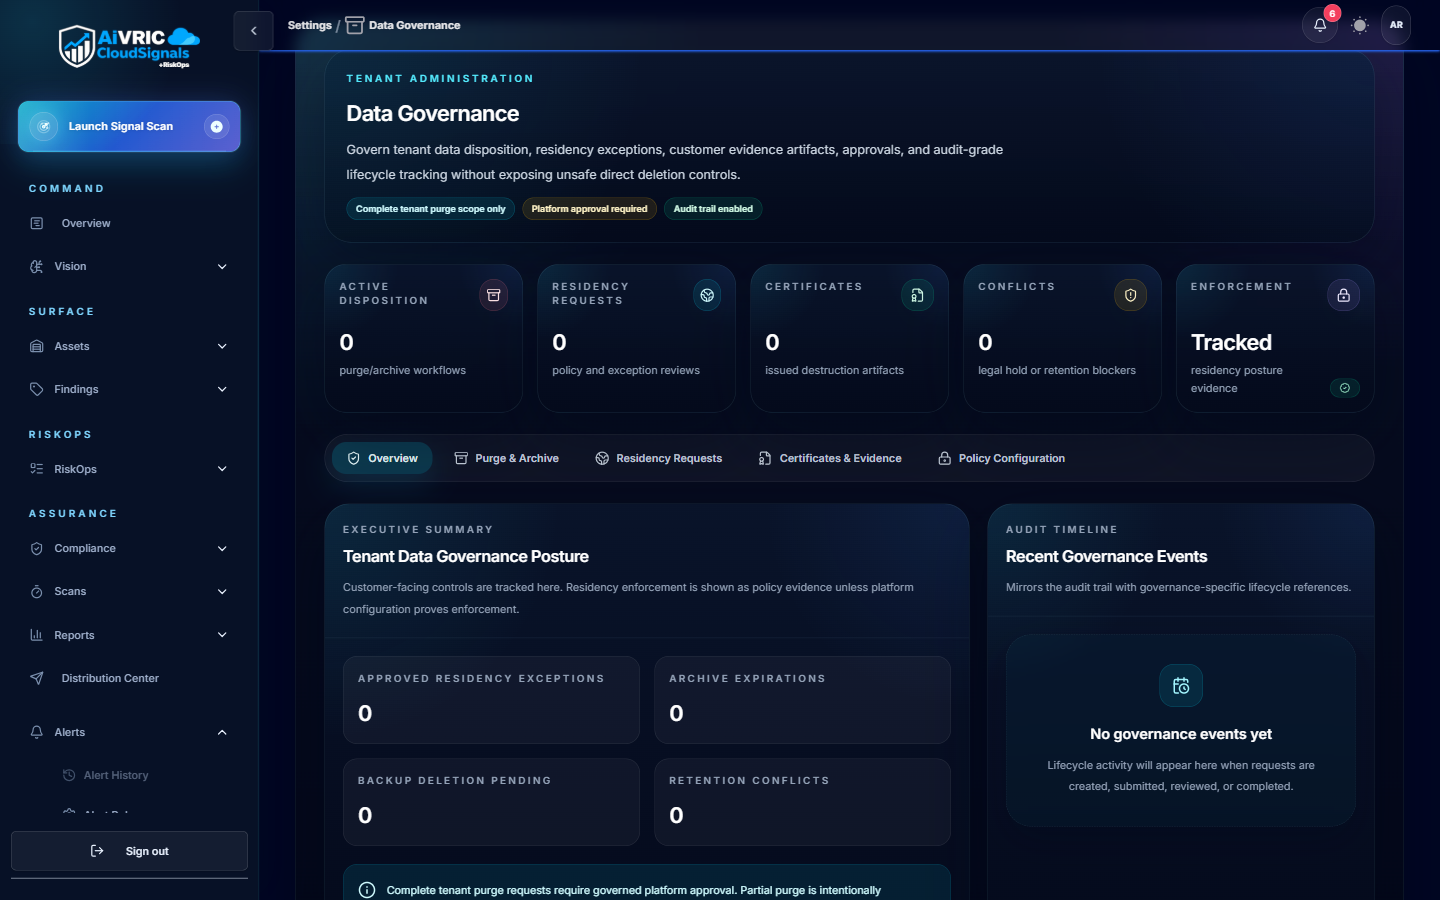
Settings — Data Governance Expand Data Governance settings showing tenant administration with advanced exception watch, advanced exceptions, resolution requests, certificates, evidence, and policy configuration tabs
Data Governance — the tenant administration layer for GRC operations. Tabs cover advanced exceptions, resolution requests, certificates & evidence, and policy configuration — all the administrative controls that underpin RiskOps workflows.
Knowledge Check
In what order must you create GRC records to successfully associate a GRC user with a managed entity?
Create the GRC user first, then create the managed entity and link it retroactively — the platform handles retroactive linking automatically.
Create the managed entity first (and confirm it is active), then create the GRC user and associate the entity — the entity selector only shows active, existing entities.
The order doesn't matter — you can create GRC users and managed entities in any order and link them afterward.
Create a client record in the Provider Console first — this automatically generates a managed entity and GRC user template.
Move on when you have created at least one active managed entity and one GRC user with entity association in your tenant.
5

RiskOps Entitlement

Enable or disable RiskOps and verify the expected state in navigation and GRC.

What RiskOps entitlement controls

The RiskOps entitlement toggle controls whether the RiskOps module — business processes, scenarios, risk register, treatments, quantification, and security exceptions — is accessible in a tenant. GRC Administration is always available to provider administrators regardless of RiskOps entitlement state — disabling RiskOps removes the operational risk workflows but does not remove managed entities, GRC users, or GRC AI settings.

Default behavior

  • Provider and white-label tenants default RiskOps to disabled at provisioning.
  • Provider Admins can enable or disable RiskOps for their own tenant (when allowed by their entitlement configuration).
  • Provider Admins can enable or disable RiskOps for downstream clients.
  • Existing commercial CloudSignals tenants keep their current RiskOps behavior — the toggle does not retroactively change behavior for tenants where RiskOps was already active.
In the platform — Enable RiskOps for a tenant
1
Open Provider Console > Dashboard or navigate to the client entitlement area.
2
Review the current RiskOps module state — confirm whether you are enabling for your own provider tenant or for a specific downstream client.
3
Enable RiskOps and save the entitlement change. Wait for confirmation from the platform before navigating away.
4
Refresh the page or navigate to Overview. Permission caches need to refresh after role or entitlement changes. If RiskOps does not appear, sign out and sign back in.
5
Verify the following appear: RiskOps menu, risk governance pages, GRC Users page, Managed Entities page, and that managed entity reference options load in GRC user association.

After enabling RiskOps — verification checklist

RiskOps menu appears in the left navigation.
Risk Governance pages open without errors.
Business Processes, Scenario Intelligence, and Risk Register are accessible.
GRC Administration (Settings > GRC Administration) remains accessible to Provider Admins.
GRC Users page opens and managed entity reference options load.
Provider Admin can access all required RiskOps settings.

After disabling RiskOps — verification checklist

RiskOps menu is hidden or blocked in the left navigation.
GRC Administration (Settings > GRC Administration) remains accessible to Provider Admins.
Existing GRC users and managed entities remain visible and intact.
No GRC roles have been deleted — GRC roles should persist through entitlement state changes.
Provider Console — RiskOps Module Expand Provider Console Dashboard with RiskOps Module section showing Current State Active, Default Disabled, last update timestamp, and Enable RiskOps toggle with Save RiskOps access button
RiskOps Module panel — shows current state, the default for new clients, last update timestamp, and the Enable/Disable toggle. After saving, refresh the portal and verify navigation before confirming to users.
Knowledge Check
When RiskOps is disabled for a tenant, which GRC capability must remain available to Provider Administrators?
Nothing — disabling RiskOps removes all GRC and risk-related capabilities until re-enabled.
Only the Risk Register — risk items already created are preserved in read-only mode.
GRC Administration (managed entities, GRC users, GRC AI settings) remains available to Provider Admins when GRC is enabled — disabling RiskOps hides operational risk workflows but not the GRC configuration layer.
Only the AI settings — model configuration is not part of RiskOps and always remains accessible.
Move on when you have verified the enable and disable checklists at least once in your tenant.
6

AI Configuration

Configure Vision AI and GRC AI independently — they are not the same setting.

Two AI configuration areas — two separate controls

CloudSignals has two separate AI configuration areas. This is the most common source of AI-related support tickets: providers configure one area and expect it to apply to both. It does not.

Vision AI Configuration

Controls: Vision Chat, Prompt Vault assisted runs, Model Insights, and Vision-oriented analysis.

Location: Vision > AI Signals Config (or Vision Model Configuration)

Changing this does not update GRC AI features.

GRC AI Configuration

Controls: GRC and RiskOps AI support, risk narrative assistance, governance summaries, GRC administrative AI features.

Location: Settings > GRC Administration > AI Settings

Changing this does not update Vision Chat.

If Vision Chat isn't working: Check Vision AI configuration — not GRC AI.
If GRC risk narratives aren't working: Check GRC AI settings — not Vision AI.
Configuring one area does not configure the other. If your provider instance uses both Vision and GRC/RiskOps AI, you must configure both areas.

Required fields for AI configuration (both areas)

  • Configuration name — a descriptive name for this configuration record.
  • Provider — e.g., OpenAI, Azure OpenAI.
  • Endpoint or model deployment reference — the API endpoint for the configured model.
  • Model — the specific model version (e.g., gpt-4o, claude-3-5-sonnet).
  • Temperature — keep low (0.1–0.3) for security and compliance analysis. Higher temperature increases creative variation, which is not desirable for factual risk outputs.
  • Max tokens — sufficient context window for long findings, reports, and evidence summaries.
  • API key or credential reference — rotate per your provider key policy.
  • Business context — a brief description of the provider or client context; used by the model to calibrate responses.

Validation after configuration
Validate AI configuration — both areas
1
After configuring Vision AI: navigate to Vision > Chat and send a simple test prompt such as "Summarize the top 3 risks in this environment." Confirm a coherent response is returned.
2
After configuring GRC AI: navigate to a risk record in RiskOps and attempt to generate a risk narrative or governance summary. Confirm AI output is returned without an error.
3
If either test fails: re-check the endpoint URL, model name, API key, and token limits. Confirm the key has not expired and the model is available from the configured provider.
4
Security check: confirm that no secrets, private keys, access tokens, passwords, or regulated data were included in test prompts. Treat AI prompts as data that may be logged.
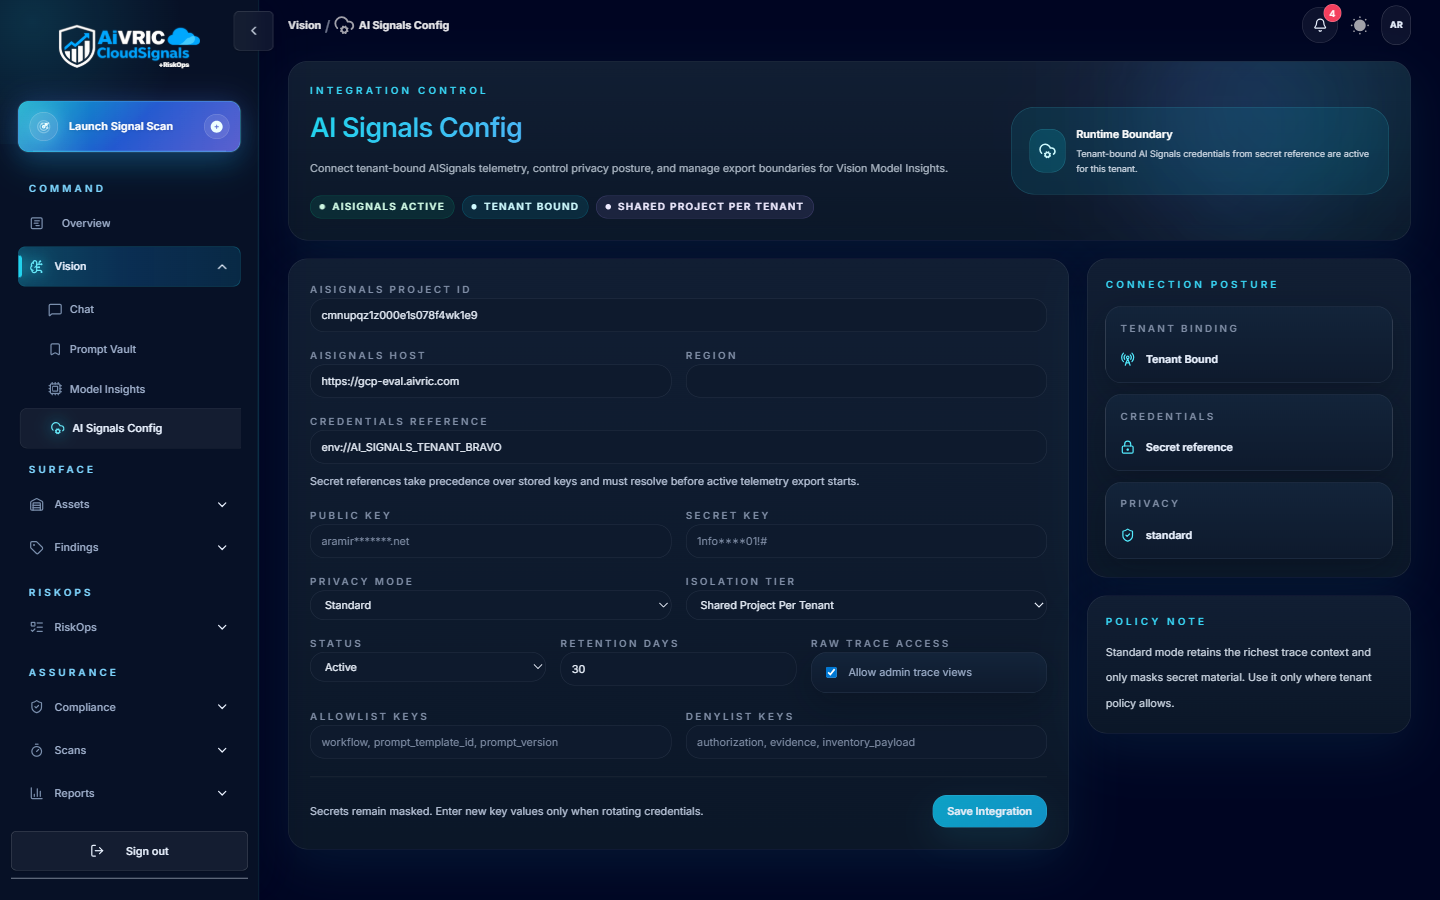
Vision — AI Signals Config Expand Vision AI Signals Config page showing integration control with endpoint, API key fields, connection routine settings, and Test Integration button
Vision AI Config — controls Vision Chat, Prompt Vault, and Model Insights. Configured separately from GRC AI.
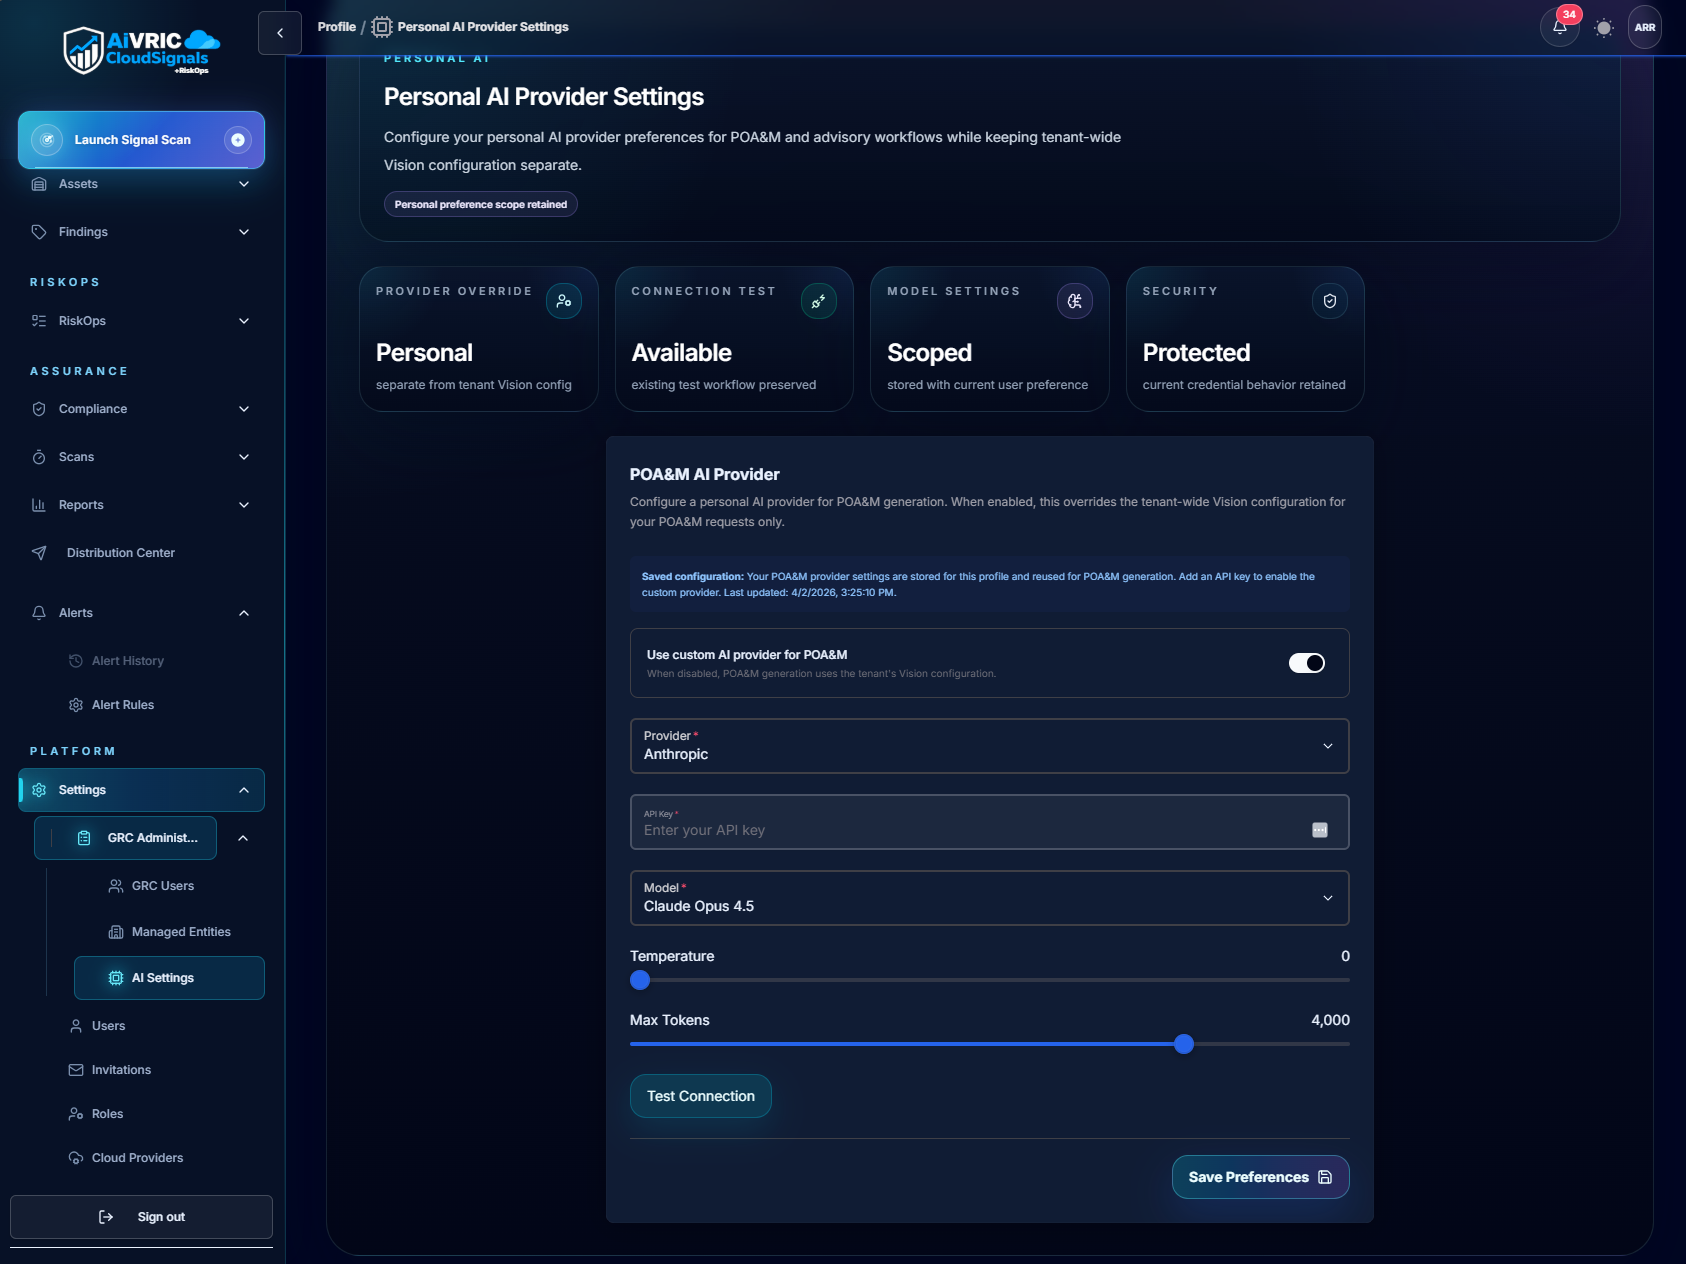
Settings — GRC AI Expand Overview dashboard shown when GRC AI settings page navigation was attempted — illustrating that this is a separate path from Vision AI config
GRC AI Settings — controls risk narrative support and governance summaries. Navigate via Settings > GRC Administration > AI Settings.
Knowledge Check
A provider reports that Vision Chat works correctly but GRC AI risk narratives return errors. What should you investigate?
The Vision AI configuration — if Vision Chat works but GRC AI doesn't, the problem is a misconfiguration in the Vision AI settings.
RiskOps entitlement — GRC AI is only available when RiskOps is fully enabled and all modules are active.
The GRC AI settings (Settings > GRC Administration > AI Settings) — Vision AI and GRC AI are separate configuration areas. Working Vision Chat proves the Vision AI config is correct, but GRC AI has its own endpoint, model, and key configuration.
The provider's AI usage limit — one AI configuration handles all AI features and may have hit a rate limit.
Move on when you have validated both Vision AI and GRC AI configurations with test prompts.
7

Operating Cadence & Quality

The recurring administrative rhythm that keeps the provider service healthy.

Provider Admin operating cadence

CadenceKey activities
Daily Review Provider Console dashboard (Needs Action, stuck onboarding, command queue). Check scan failures and stale scan status. Review critical and high finding changes. Check urgent support cases.
Weekly Review asset ownership gaps. Review unassigned findings and overdue remediation. Review RiskOps work queues. Review managed entity mapping changes (after any client onboarding/offboarding). Review open security exceptions. Prepare client operating notes.
Monthly Review provider user access — remove stale accounts. Review Provider Admin and GRC Admin roles. Review client package and entitlement alignment. Review branding (confirm it still renders correctly in both themes). Review report distribution recipients. Review accepted risks and exceptions. Review AI settings and key rotation schedule.
Quarterly Review role model — is every role assignment still appropriate? Review service package definitions. Review scan coverage across all clients. Review offboarded clients and inactive users. Review data retention and reporting practices. Update training material if product has changed significantly.
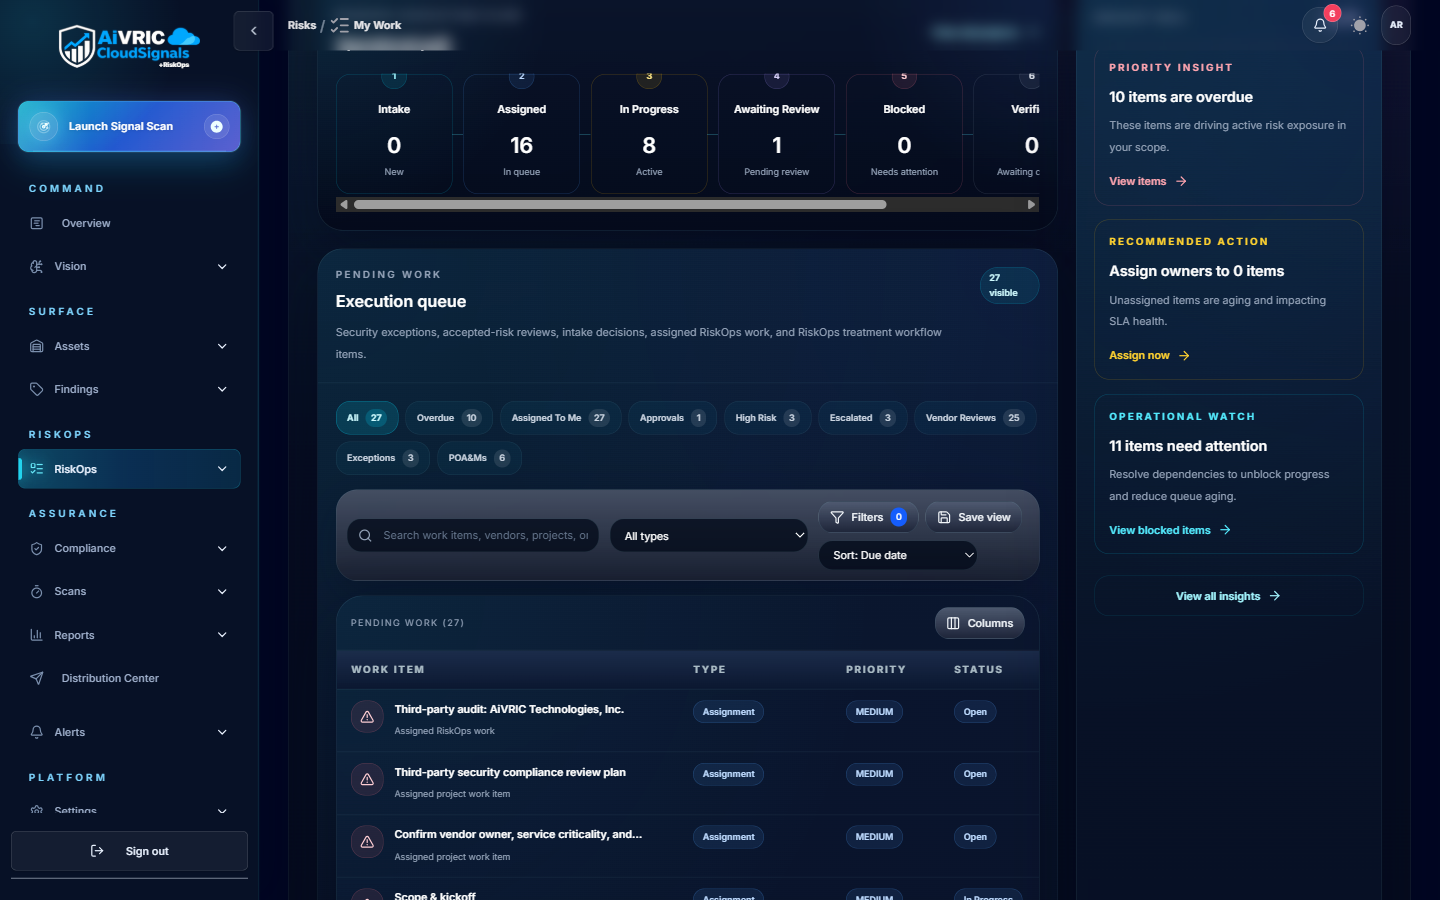
/risks/my-work Expand My Work execution queue showing assigned risk items, overdue count, active tasks by priority, and operational match panel
My Work — the daily operational starting point for provider operators. All assigned risk decisions, pending approvals, and overdue items surface here. Review this queue at the start of every session before switching to the Provider Console dashboard.
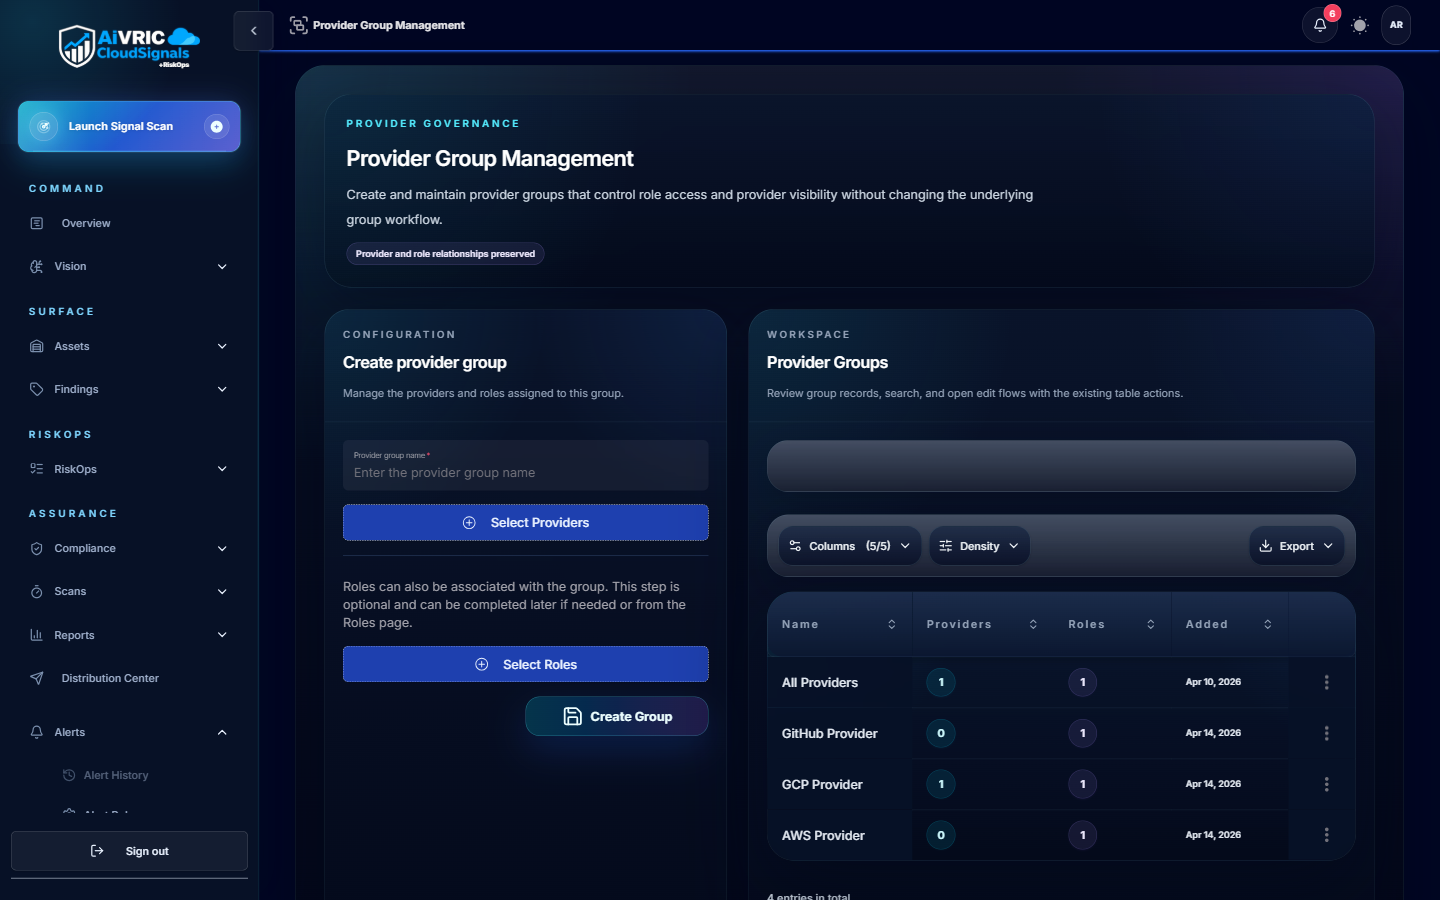
Provider Console — Groups Expand Provider Group Management page showing group creation form and existing groups table with All Providers, Customer Service, Marketing, and AWS Provider entries
Provider Group Management — create and maintain provider groups that control role access and provider visibility without changing the underlying group workflow. Use groups to scope client access and apply role changes at scale.

Provider quality standards

Clear ownership on all Critical and High findings — no unowned findings older than 5 days.
Current scan data — no client with a scan older than the agreed cadence without documented reason.
Accurate managed entity mapping — every active client has a managed entity with assigned owner.
No stale Provider Admin access — users who have left or changed roles have been deactivated.
No secrets in prompts, notes, tickets, or reports — ever.
Documented rationale for every accepted risk and security exception.
Repeatable monthly reporting cadence — every active client receiving a report on schedule.

When to escalate to AiVRIC

The following conditions should be escalated to AiVRIC support — do not attempt to resolve these through provider-side configuration changes alone:

  • Provider portal is unavailable or returns 5xx errors.
  • Branding does not render after publishing and validating the URL.
  • RiskOps entitlement state does not match navigation or API behavior after re-enabling.
  • GRC Administration endpoints return errors for a valid Provider Admin.
  • Managed entities don't appear in GRC user association after being created and confirmed active.
  • AI model configuration fails with confirmed valid credentials and endpoint.
  • Scan failures persist after cloud access has been re-validated.
  • Dashboards show inconsistent data that doesn't update after scan completion and refresh.
  • A security, privacy, or data exposure concern is suspected.
When escalating, always include: Provider name, portal URL, affected user email, client or managed entity name (if applicable), page URL, timestamp, screenshot, and steps to reproduce. Never include secrets, tokens, or private keys.
🏅
Course complete!
You've completed Provider Admin & CRPM Operations. Your provider instance is configured, your operating cadence is established, and you're ready to run a production-grade CloudSignals service.
Next: Getting Started with RiskOps All courses
Interaction recording
Treatment Execution Workspace in motion — rows highlight on hover, showing how a provider operator reviews and acts on active treatment plans during the weekly RiskOps review.
Complete this module to unlock your course completion.